My latest project: G16B into Suzuki Carry

Status
This is not open for further replies. We close very old threads, and if this is the case, please start a new one on the same topic.

Bryan

RMS Regular
Messages
10,026
Location
Tandragee
I got this little van last week for very little money :grinning:

suzukicarrytrailer.jpg


It's a 2004 Suzuki Carry but I didn't find out what age it was until I got it home and found the 54 reg number plates in the back of it.

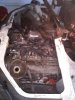
The original 1.3 (G13B) engine was in pieces in the back of the van. It looks like it suffered big end failure. I don't think all the pieces were there to even put it back together.

Rather than replace or repair the original engine I've decided to install a G16B (1.6 16V 95BHP) instead.

G16B.jpg


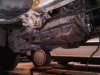
And here's the engine temporarily mated to the Carry gearbox - requires the use of the Carry flywheel and clutch and a few other simple modifications but initially it looks like it will go together. The G16B uses 12mm mounting bolts but the G13B used 10mm so the holes in the gearbox had to be enlarged to suit.

enginegearbox.jpg


Both the inlet and exhaust manifolds from the Carry's original engine bolt straight onto the 1.6 so it looks like this is going to be quite a simple upgrade. The 1.6 even uses the exact same coil packs as the 1.3.

carryinlet.jpg


I can't wait to get the engine bolted together and offer it up to the van to see how it fits. I still need to source a flywheel and starter from a G13B Carry to complete the package.

Everything's looking good so far and only the sump requires a bit of alteration to clear the big end bearing caps which are larger in the 1.6...
 

Coog

Admin
Messages
47,732
Drives
GTI
Brilliant!

Never a predictable project with you Brian but each one of them is right up my street :laughing:

Is that a Musso? :cool:
 

Bryan

RMS Regular
OP
Bryan
Messages
10,026
Location
Tandragee
Yes, shamefully that is my mum's Musso.

Surely the slowest turd on 4 wheels but it'll pull that trailer loaded all day long.
 

Coog

Admin
Messages
47,732
Drives
GTI
I've a soft spot for them :oops:

Once the engine is in what's the plan?
 

Bryan

RMS Regular
OP
Bryan
Messages
10,026
Location
Tandragee
I think I'll paint it in the Bedford Cargo blue colour and then I'll be using it for work. No point taking the 3 litre van out for the break-fix jobs.
 

forde

RMS Regular
Messages
8,294
Drives
Vectra SRi
if all the other stuff on the engine is the same then the 1.6 is probably just a bored out 1.3 so should fit the same? or have you measured it to be bigger
 

Bryan

RMS Regular
OP
Bryan
Messages
10,026
Location
Tandragee
Physically it's about 2cm taller than the 1.3 block but everything else is identical.

I'm still wondering if the original 1.3 ECU will be able to run it though.
 

Bryan

RMS Regular
OP
Bryan
Messages
10,026
Location
Tandragee
Turns out the sump doesn't need modified at all...

Engine%20with%20new%20sump.jpg


I was going by the documentation of someone who has done this before but they were using a G16A engine and I'm using a G16B engine which seems to be totally different and most parts are just bolt on.

Inside%20Sump%201.jpg


And the crank clears all of the protrusions in the sump:

Inside%20sump%202.jpg


Now I have another problem though.

The gearbox bolt holes don't all line up with the G16B block. The top two bolts line up ok but the lower two bolts don't.

The lower two holes are about 2cm inboard towards the block. I could drill these into the "wings" in the block but there isn't much metal there to attach them to.

wing_right.jpg

wing_left.jpg


What would be the best way to go about this without getting a custom adapter plate made up?

I want to avoid the need for an adapter plate because I don't want to have to put a spacer behind the flywheel etc.
 

redbaron

RMS Regular
Messages
231
Location
through the hedge
Drives
swedish tank
I'd say an engineering / fabricator should be able to weld a bit onto the back of said 'wing' to let you put a bolt through, or get a thick piece of steel which aligns to gear box holes then 20mm outwards have the engine bolt holes ( same idea as wheel pcd adaptors ) love this project though
 

Bryan

RMS Regular
OP
Bryan
Messages
10,026
Location
Tandragee
Well here is today's progress...

Stripped1.jpg

Stripped2.jpg


It's more or less stripped ready for prep and paint now. Going to get the paint tomorrow and hopefully have it done by the end of the week.

I think I've also figured out the gearbox mounting problem something along the lines of what you're saying above redbaron.

Parts sourced so far: Flywheel and engine mount

Still to get:
- Both rear tail lights
- Complete exhaust
- Clutch
- Starter Motor
 

Bryan

RMS Regular
OP
Bryan
Messages
10,026
Location
Tandragee
Update: 31st March 2011

New%20Parts.jpg


A whole load of new parts arrived earlier this week for the engine. I ordered a new timing belt kit because I didn't know when the belt was last changed and since the engine is out of the van it makes sense to change it.

Here's a shot of the engine with the new timing belt installed:

New%20Timing%20Belt.jpg


It's a very simple job - I usually shy away from working with the timing belt. I hate them. But this engine was very simple. All you need to do is line the stamped in letter "E" on the top pulley with the groove in the cam cover and the punched mark in the lower pulley with the arrow directly above it.

Modifications required to install a G16b into a Suzuki carry:

* Original dipstick from the G16 engine needs to be blocked
* Oil pickup pipe needs to be modified using the pipe from the G16B and the G13B engines

Dipstick Modification

Modified%20dipstick.jpg


I thought about how I was going to plug the hole for the original dipstick that came with the G16B engine for a few days but I eventually decided to just plug the pipe and reinstall it. I did this by flattening the end with a hammer and them welding it permenantly closed before refitting it to the engine. Because of the angle the engine sits at in the Carry van this won't cause a problem because there isn't really any way in which the oil can even get back up the tube.

In the photo below you can see where the new dipstick is located - this is the original dipstick from the G13B engine and it mounts to the angled sump. When the engine is installed in the van this dipstick will be near enough vertical.

Dipsticks.jpg


Oil pickup pipe modification

*** This is a critical modification *** - Failure to do this will result in no oil pressure

The oil pickup pipe from the G13B has a smaller bore than the one from the G16B. However, the G16B pickup can't be used because of the angle of the sump. What you need to do is remove the tip from the G16B oil pickup pipe and weld it onto the end of the pickup pipe from the G13B.

The photo below shows the difference in size between the two pickup pipe ends. The G16B is on the left and the G13B is on the right. You can clearly see the difference in the bore of the pipe.

Oil%20Pickup%20ends.jpg


Below is the finished oil pickup pipe. I decided to cut the pipes above the flat metal plate so that the seal it makes when you install it isn't effected in anyway. You could cut it below the flat plate in theory but you would need to weld it very carefully to acheive a perfect circle again. There is a rubber o-ring that goes around the end of the pipe between the flat plate and the engine block. I removed this o-ring before welding the pipe just to make sure it wasn't damaged.

Modified%20Oil%20Pickup%20Pipe.jpg


And the oil pickup pipe installed in the engine:

Modified%20Pickup%20Pipe%20installed.jpg


You can see above that the support leg from the oil pickup pipe is bolted into the third main bearing cap. This was the same position on the G13B engine and did not require any modification.

TIP: Bolt the end of the oil pickup pipe to the engine and tack it in place on the end of the oil pickup pipe to ensure that you get the bolt hole lined up correctly. Otherwise it could be a major pain getting the whole thing lined up properly.

This is a critical job to ensure that the oil can be picked up properly from the angled sump of the engine. It took me quite some time to do this and get it right - don't rush it!

Problems encountered:

The driver's side engine mount is going to be an issue on the G16B block because the studs that it bolts to stick out about 5mm further than those from the G13B block. You can see below the three stud holes that the engine mount bolts to - the lower two studs stick out too far which means that the top one will either need packed out with washers or the engine mount will need to be modified.

I haven't decided what route I'm going down with this one so stay tuned for the next update.

Engine%20Mount%201.jpg
 

Coog

Admin
Messages
47,732
Drives
GTI
Flip me Bryan some work going into this! Making huge progress too. Keep us updated chum, great thread! :laughing:
 

Bryan

RMS Regular
OP
Bryan
Messages
10,026
Location
Tandragee
Don't have enough time to work on it at the minute... might be another week before it's painted. There's a few dents that need sorting that'll make it take even longer.

Finding parts for this little yoke is a nightmare as well.

I'm still missing the clutch (ebay prices are a joke for the kit!!), passenger rear tail light and full exhaust system. If I have time tomorrow I might bring the gearbox and flywheel down the Clarke Bros on the Ormeau Road to get a clutch to suit.
 

Bryan

RMS Regular
OP
Bryan
Messages
10,026
Location
Tandragee
Been busy with the bodywork on the van over the past few days.

It's nearly totally rubbed down to 240 grit but it'll need done over again in 400 before primer.

Rubbed_down.jpg


I also fixed the dent in the bonnet you can see in the photo above. Because of where the dent was it was impossible to push it out from behind because of the bonnet reinforcement. I welded a screw onto the middle of the dent and pulled it out with a claw hammer - and just kept repeating the process welding the screw in different positions until the dent was pulled out almost to where it was originally.

Dent1.jpg


And then the dent after pulling:

Dent2.jpg


And again after a thin skim of filler to smooth over the original shape:

Dent3.jpg


I was quite pleased with the result - looks much better than it did before. I also used this same technique for the dent in the lower rear quarter panel which is now also pulled out and skimmed over as good as new.

I've also got hold of nearly all the parts I need now to complete the engine - the only thing I need to get now is a crank position sensor from the original 1.3 engine because this was missing and the 1.6 version is different.
 

Bryan

RMS Regular
OP
Bryan
Messages
10,026
Location
Tandragee
Update 7th April 2011

I spent today getting the engine and gearbox ready for installation in the van. My first task was to modify the engine mount to address the problem highlighted above. I measured the depth of the holes in the block because I thought that I would just be able to file them down level with the top hole but this wasn't the case - they are the same depth.

What I did was cut a section out of the engine mount and then recessed it to allow for the extended studs - see the photos below:

TIP: Modify the engine mount before installing the intake manifold - it would make access a lot easier!!

enginemount1.jpg


You can see in the photo below how the lower two holes have been "recessed" into the engine mount to allow for the additional 5-6mm in the length of the mounting points on the engine.


enginemount2.jpg


And this is the engine mount installed on the engine:


enginemount3.jpg


By modifying the engine mount itself this will mean that the engine will sit in the exact same position as the original G13B engine. I could have simply packed out the top hole with washers to take up the extra gap but then this would have meant the engine wouldn't sit where it was designed to and could have potentially put pressure on the gearbox/clutch etc.

After I finished modifying the engine mount I turned my attention to the engine and mounted the clutch to the flywheel and then fitted the gearbox and starter motor. Essentially now the engine and gearbox are ready to be installed in the van.

enginebuiltup2.jpg


I still have to secure the gearbox to the "wings" on the engine where the bolt holes don't line up and I also need to swap over the cam position sensor and housing from the original engine because this also looks to be different on the G16B.

More soon...
 

Bryan

RMS Regular
OP
Bryan
Messages
10,026
Location
Tandragee
Quick Update:

32846d1302475786-my-latest-project-g16b-into-suzuki-carry-engine-1.jpg


Engine is in the van and wired up - just need to charge the battery before I can try and start it.

Hopefully get stuck into it again tomorrow.
 

Attachments

  • Engine In 1.jpg
    Engine In 1.jpg
    27.3 KB · Views: 793
  • Engine In 2.jpg
    Engine In 2.jpg
    35.7 KB · Views: 376

Bryan

RMS Regular
OP
Bryan
Messages
10,026
Location
Tandragee
It's been a while since I did an update on this but the engine is in and running. Still got an engine warning light on the dashboard though but then it is the 1.3 ECU running a 1.6 engine.

It's also been rubbed down and had the first coat of primer.

Can't wait till it gets some colour and then build it up again.
 

Attachments

  • Primer 1.jpg
    Primer 1.jpg
    53.8 KB · Views: 988

Bryan

RMS Regular
OP
Bryan
Messages
10,026
Location
Tandragee
Well its the 1.6 twin cam 16v engine so I think they are about 95bhp.

Should go rightly.
 

Bryan

RMS Regular
OP
Bryan
Messages
10,026
Location
Tandragee
It's had its first coat of blue top coat:

firstcoat1.jpg

firstcoat2.jpg


It needs rubbed down and a few more coats but it's looking well.

Can't wait to get it built up again.

Need to get some mini lite wheels or something for it.
 

KJS

RMS Regular
Messages
1,891
Drives
VW Tiguan
Looking great Bryan. I'd love a spin in it once done :p (y)
 

Doovde

Banned
Messages
6,200
Drives
Nothing ford/VAG
Cool wee van (y)

Would been better if you mounted the body on a jimny chassis though :p

Unrelated Q : whats the Musso like for towing?
 

Bryan

RMS Regular
OP
Bryan
Messages
10,026
Location
Tandragee
Unrelated Q : whats the Musso like for towing?

It's dead slow and stop - towing or not towing. It doesn't seem to be bothered towing a loaded trailer. I think it could pull a house down without noticing but it'll still be very slow to accelerate.

It's my mum's jeep and she loves it but she never goes anywhere fast. It's got the 2.9 Merc engine with an autobox. She didn't even know how to put it into 4wd nevermind hi and low until I showed her and explained what they were supposed to be used for.
 
Status
This is not open for further replies. We close very old threads, and if this is the case, please start a new one on the same topic.
Top